bulb vegetable · Amaryllidacées
ShallotAllium cepa var. aggregatum
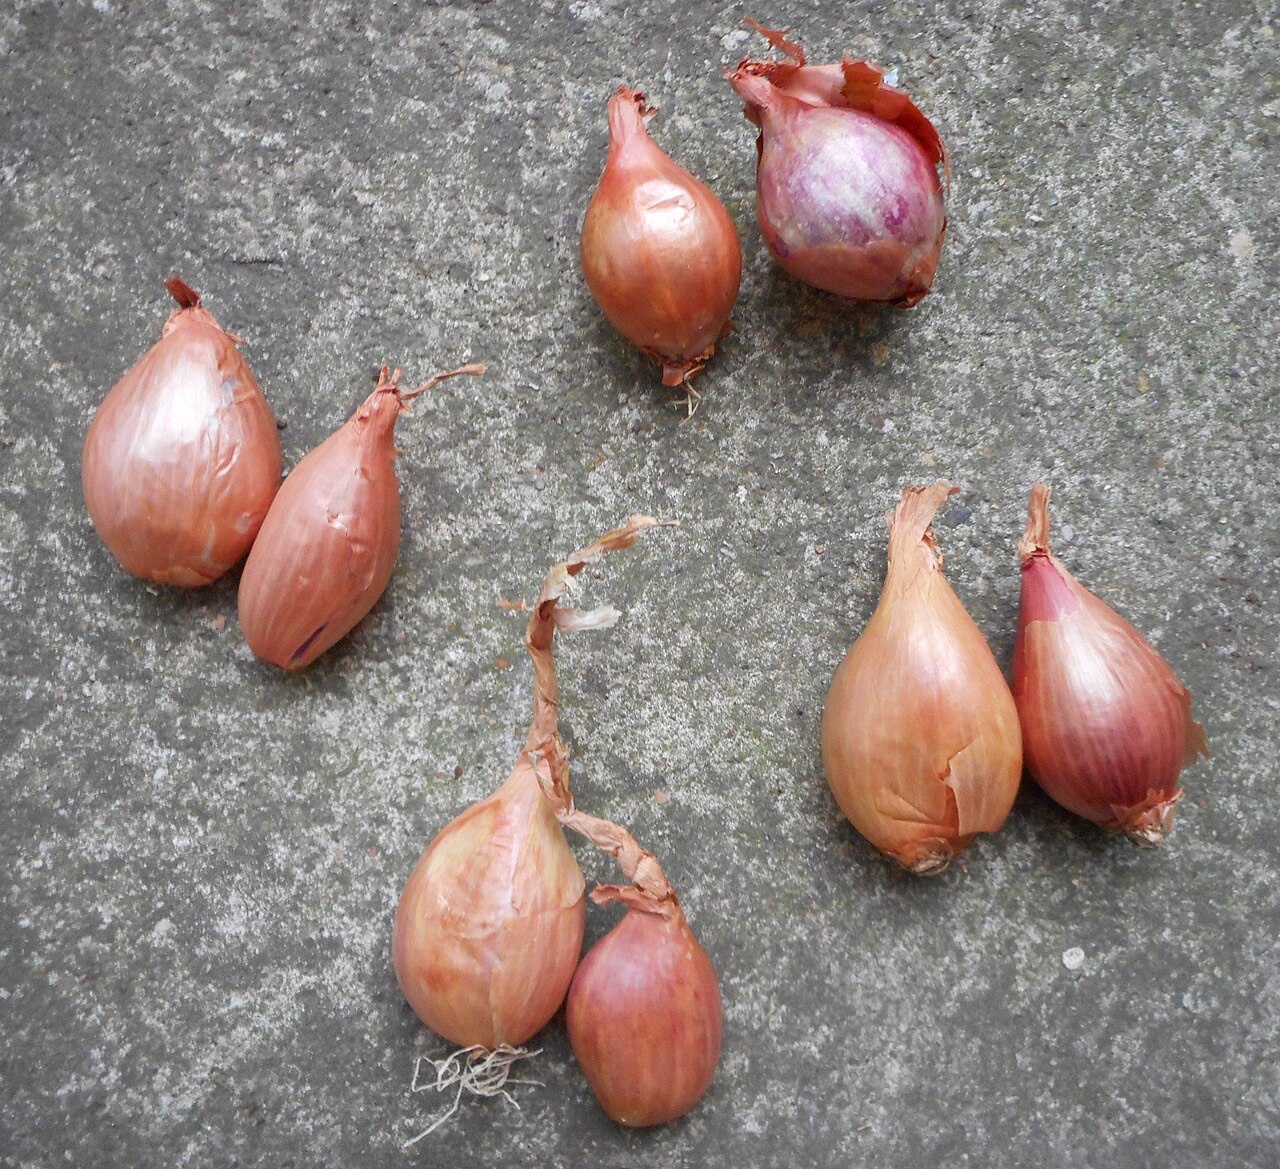
Finer than the onion, the shallot is a pillar of the kitchen and a crop of disarming simplicity: one bulb planted in February gives six to ten in July. It asks for drained soil and sun, makes do with nothing else and keeps all winter in a net.
- Difficulty
- Easy
- Exhibition
- Full sun
- Watering
- Low, only in drought, stopped three weeks before harvest
- Floor
- Light, well drained, without fresh manure
- Spacing
- 15 to 20 cm along the row, 30 cm between rows
- Harvest
- 120 to 150 days after spring planting
Calendar · Belgian climate
When to sow, plant and harvest
| Activity | Jan | Feb | Mar | Apr | May | Jun | Jul | Aug | Sep | Oct | Nov | Dec |
|---|---|---|---|---|---|---|---|---|---|---|---|---|
| Plantation | yes | yes | yes | yes | yes | |||||||
| Harvest | yes | yes | yes |
Step by step
1Sowing
The traditional shallot is multiplied from bulbs, not seed. Some modern varieties, known as seed shallots, can however be sown in March-April like onions, in drills one centimetre deep, and give a single bulb per plant. The classic method remains planting certified bulbs, bought from a garden centre or kept from the previous harvest, chosen firm, healthy, medium-sized, with no shoot or trace of mould.
2Planting out
Plant from February to April, as soon as the soil can be worked, or in October-November for the grey shallot in well-drained soil. Push each bulb in point upwards, leaving the tip showing, every fifteen to twenty centimetres, in rows thirty centimetres apart. Soil that is too rich or freshly manured causes rot: choose a bed that received compost the year before. In heavy soil, plant on a ridge.
3Caring
Hoe and hand-weed regularly; the shallot suffers from competition from weeds. If birds dig up the freshly planted bulbs, put them back and cover with a net for a few weeks. Water only in prolonged spring drought, and stop all watering three weeks before harvest. Avoid thick mulch, which keeps moisture at the neck. Remove any flower stalks. No fertiliser is useful.
4Harvesting
Harvest from late June to August, when the foliage yellows and flops over, in dry weather. Lift the clumps with a fork and separate the bulbs gently, without damaging them. Leave them to dry on the ground for two or three days in the sun, leaves still on, or under an airy shelter if it rains. The shallot can also be picked green from May, like a spring onion, to flavour salads and omelettes.
5Storing
After two weeks of thorough drying in the shade, in an airy place, clean the bulbs of soil and dry leaves, and put them in nets, crates or plaits in a dry, cool, dark place. They keep for six to nine months, until the following spring, without a fridge. Set aside the finest medium-sized bulbs for next year's planting.
Further reading
Planting and caring for plants properly
How to plant properly
Choosing the spot
The shallot asks for exactly what the onion wants: full sun, air and a soil that does not hold water. Put it on the most open bed in the vegetable garden, never at the foot of a north wall or under a tree. In our clay gardens, give it the highest part of the plot or a raised bed, as a bulb sitting in water in March does not come up. The ideal spot is where last year's squashes, potatoes or cabbages grew, already manured and weeded. Allow four years before bringing it back to the same bed.
Preparing the soil
As soon as the soil is no longer sticky, in February, loosen it with a broadfork to twenty centimetres and refine the surface with a rake. No manure, no fresh compost: the shallot prefers soil fed the year before, and any young organic matter makes it rot. Soil that is too rich in any case produces clumps of large leaves and soft bulbs. In heavy soil, work in coarse sand and shape ridges or raised rows ten centimetres high. Run a roller or a plank over it to firm it slightly: the shallot anchors better in a soil that is a little settled.
Choosing your bulbs
Buy certified bulbs from a garden centre or keep the finest from your own harvest, never supermarket shallots, which are often just elongated onions or treated bulbs. Choose medium-sized bulbs, firm, without shoot or blemish: large ones give many small shallots, small ones give few large ones. Pink and long shallots, such as Jermor or Longor, are the safest bet here. The grey shallot, more fragrant, demands perfect soil and autumn planting. Seed shallots, such as Ambition, are sown in March like onions and give a single bulb, without dividing.
Planting in February-March
The ideal Belgian window runs from mid-February to the end of March, as soon as the soil can be worked without sticking. A later planting, in April, is still possible but reduces the harvest. Mark out rows thirty centimetres apart and push each bulb in point upwards every fifteen to twenty centimetres, leaving a third of it showing. Do not force it into hard soil; dig a small hole with a trowel. Firm around it. Do not water. Blackbirds and crows are fond of digging up freshly set bulbs: lay a net or fleece for two to three weeks.
Autumn planting
The grey shallot and some pink varieties tolerate an October-November planting, which gives larger bulbs and a harvest from June. It is only worth considering in light soil or on a strongly raised bed: in clay waterlogged all winter, loss is almost certain. Plant a little deeper, the bulb just covered, and do not mulch. Frost is not a problem; moisture is. If you are starting out, try it on a single row and compare with your February planting: in most Belgian gardens, the latter remains the most reliable.
In pots or containers
A container twenty-five centimetres deep in full sun suits it very well. Use a mix of two thirds potting compost and one third sand, with clear drainage holes. Plant the bulbs every twelve centimetres, tip just showing, in February-March. Water only when the compost is dry several centimetres down and shelter the container from driving rain in spring. The clumps will be a little more modest than in open ground, but a container-grown shallot provides delicious green leaves to snip from May, and good-sized bulbs by late June.
Beginner's mistakes
Pushing the bulb in completely is the most common fault: it must stick out, otherwise it rots or stays small. Planting in freshly manured soil or watering heavily after planting has the same effect. Cramming the bulbs at ten centimetres stops the clumps from developing: the shallot needs room to divide. People often forget that emergence takes two to four weeks and think the planting is lost. Finally, replanting your own bulbs year after year without sorting ends up passing on viruses and eelworms: buy fresh certified bulbs every three years.
Look after it properly
Watering just enough
The shallot almost always makes do with spring rain. Water only if the soil is dry five centimetres down and the leaves lose their firmness, which hardly ever happens before May. One watering can for two metres of row, at the base and in the morning, is enough. Never wet the foliage, the entry point for downy mildew. From mid-June, or three weeks before the planned harvest, stop all watering: the bulbs must finish ripening in soil that is drying out. In a container, water more often but always in small amounts, and let it dry out between waterings.
Hoeing and weeding
Nothing replaces a hoeing every two weeks from March to June. It breaks the crust that forms on our loamy soils after rain, aerates the roots and removes weeds before they compete with the clumps. Hand-weed right next to the bulbs so as not to nick them. Avoid thick mulch; if you are set on it, limit yourself to one centimetre of dried grass clippings, without touching the necks. No fertiliser is needed; a little wood ash in March provides potash and helps storage. Nitrogen, on the other hand, swells the foliage at the expense of the bulbs.
Exposing the clumps and removing flowers
From June, the clump divides into six to ten bulbs that push against one another and lift themselves up. Help them by gently drawing the soil away by hand so they receive the sun: this is what colours their skin and hardens it. Never earth up shallots. If a flower stalk appears, cut it at the base without delay, and plan to eat that clump first, as it will keep less well. Also remove yellowed leaves that rot in a wet summer, so that air circulates at the heart of the clump.
Preventing fly, downy mildew and rot
The onion fly also attacks the shallot in April-May: fine insect-proof mesh, laid from planting until mid-June, keeps it at bay. Alternate the rows with carrots and never compost wilted plants. Downy mildew appears in mild, damp weather, as a grey felt on the leaves: space the plants out, avoid shade and spray horsetail decoction every ten days from May. Bulb rot, the most common problem here, is prevented from planting onwards by drainage and the absence of manure. A four-year rotation protects against soil-borne diseases.
Through the season
In February-March, plant, lay the net against birds, then the mesh against the fly. In April, hoe, weed and watch for emergence, which is often slow. In May, hoe again, water if needed, start picking a few green leaves for the kitchen. In June, remove the mesh, expose the clumps, stop watering and remove flowers. In July, harvest in dry weather and dry. In August, clean, sort, store, and set aside the planting bulbs. In October-November, plant the grey shallot on a raised bed if you wish.
Harvesting and drying
Harvest from late June to late July, when two thirds of the foliage has flopped and yellowed, on a dry morning. Lift each clump with a fork and separate the bulbs by hand, gently, without tearing the skins. Leave them to dry where they are for two or three days if the sun is out, otherwise on a rack under an airy shelter. Never wash them. Continue drying for two weeks in the shade, until the necks are dry and thin. A shallot harvested before the leaves flop will not keep: better to wait a week longer.
Storing and preparing for next year
Put the dry, clean bulbs in nets or shallow crates, in a dry, airy, dark place between 8 and 18 °C, never in the fridge or a damp cellar. Check every month and remove soft bulbs. Pink shallots keep until April, long ones even longer. For the next planting, select medium-sized bulbs from the finest clumps, undamaged, and store them separately. So as not to run short of greens, plant three bulbs in a pot on a windowsill in October: their leaves can be snipped all winter.
Obtaining seeds or seedlings
Seeds and seedlings: where to find them
A selection of reputable seed suppliers that deliver to your country, listed in order of proximity. Evadya does not receive any commission: these are suppliers we recommend for their reliability.
Semailles
For Belgian artisan seed producer, organic and reproducible seeds, over 250 regional varieties, a planting calendar tailored to the Belgian climate.
Against Small organisation: limited range of hybrid varieties and possible stock shortages during peak season.
Search for ‘shallot’ on SemaillesKokopelli
For Europe’s largest collection of heirloom, organic and open-pollinated varieties; comprehensive growing guides.
Against No hybrids or seedlings; delivery times can sometimes be long during peak season; prices are slightly higher.
View the shopFerme de Sainte Marthe
For A long-established organic seed supplier, offering seeds and young plants, heirloom varieties, and nutrition and recipe guides.
Against Dispatched from the Loire: postage charges to Belgium and Switzerland; plants are fragile in transit.
Search for ‘shallot’ on Ferme de Sainte MartheGraines Baumaux
For A vast selection (over 500 tomato varieties), with high-yielding F1 hybrids and heirloom varieties side by side, and plants available in season.
Against Not much organic produce; an old site; catalogue entries rather than growing guides.
Search for ‘shallot’ on Graines BaumauxVreeken’s Zaden
For A very wide range of Dutch products, competitive prices, and numerous varieties suited to the Benelux climate.
Against Website in Dutch only; limited selection of organic produce.
Search for ‘shallot’ on Vreeken’s ZadenDe Bolster
For Dutch organic seed producer, seeds suitable for propagation, a good selection for cool climates.
Against A shorter catalogue; website in Dutch.
Search for ‘shallot’ on De BolsterZollinger Bio
For Swiss organic seeds, varieties suited to high altitudes and microclimates, and a unique phenological calendar.
Against Swiss prices and customs charges from the European Union.
Search for ‘shallot’ on Zollinger BioBingenheimer Saatgut
For A leading German name in organic and biodynamic produce, offering open-pollinated varieties selected for the home gardener.
Against Website in German; delivery charges apply outside Germany.
Search for ‘shallot’ on Bingenheimer SaatgutDreschflegel
For A collective of organic growers, specialising in rare and regional varieties, and the preservation of traditional farm seeds.
Against Small quantities; a catalogue that’s more activist than practical; website in German.
Search for ‘shallot’ on DreschflegelFrom the vegetable patch to the plate
And then we savour it
What it offers
The shallot provides antioxidants, sulphur compounds, potassium and vitamin B6. Milder than the onion, it adds subtle flavour without dominating.
In the kitchen, it’s simple
Finely chopped into a vinaigrette with cider vinegar and Dijon mustard, a garden shallot transforms a simple July salad.
Living well
Seeing a single bulb planted in February become a clump of ten shallots in July is a small lesson in the generosity of the soil.
Also worth a look
Other vegetables
Onion
Allium cepa
Garlic
Allium sativum
Florence fennel
Foeniculum vulgare var. azoricum
Tomato
Solanum lycopersicum